Gluten free Pierogi
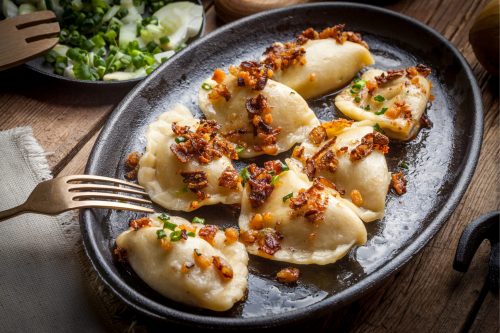
Pierogi are boiled filled dumplings, a typical dish of Central and Eastern Europe. Pierogi are very versatile and can be stuffed with a number of fillings, including potato and cheese, mushrooms, cabbage and spiced meats and fruits. They freeze well, so they make a quick and satisfying last minute meal.
Prep time: 45 mins
Total time: 1 hr
Yield: Approx. 2 1/2 dozen small pierogi
Ingredients
For the dough
- 150g Isabel’s Cassava Flour
- 110g sour cream
- 20g water
- 1/2 tsp salt
- A pinch of garlic powder (fresh garlic will also do)
- 1 large egg
- 50g butter room temperature or olive oil
Filling
- 230g warm mashed potatoes
- 115g Mature cheddar cheese, grated
To finish
- 60g butter or substitute for your favourite oil
- 150g shallots or onions, sliced
Method
1
For the dough:
- In a microwave proof bowl mix together the flour, salt and garlic (if using) and make a well in the middle.
With the bowl still over the scale, add the water, half of the sour cream, and the butter (or oil) and mix well to form a wet flour. - Lightly whisk the egg and set aside.
- Then place the bowl with the cassava mixture into the microwave and cook for 1 minute and 30 seconds on high (900w).
Remove the bowl from the microwave the paste should be cooked and hot, but not too hot to handle. So, start to bring the dough together, kneading it to make a pliable dough. If the dough is still not quite coming together, then place it into the microwave again for just a few seconds. Don’t leave the dough too long in the microwave, otherwise it become hard and unusable. - As the dough comes together and has cool down, start work in the egg bit by bit and the remaining of the sour cream, mixing well with your hands. Work in the sour cream and the egg until the dough comes together in a slightly sticky ball.
- Using just your fingertips, knead and fold the dough and sprinkle lightly with more flour if required, but just enough until the dough becomes less sticky but still quite moist.
- Knead and fold the dough until you have a pliable dough. At this stage you might also want to drizzle a few drops of olive oil and knead the dough until you are happy with the consistency.
- Wrap the dough well in plastic wrap and set aside to make the filling.
Prepping the filling:
- Combine the warm mashed potato and cheese. Stir and mash until the cheese is melted and the filling is cool to the touch. Taste and adjust the seasonings with salt and pepper.
Filling the pierogi:
- Roll half the dough 2mm thick. Use a 2-inch round cutter to cut circles of dough. Repeat with the other half of the dough. Save the scraps; these can be snipped into small pieces and added to simmering soups.
- Place 1 1/2 teaspoons of filling on each round of dough. Gently fold the dough over, forming a pocket around the filling. Pinch the edges of the pierogi to seal, then seal again with the tines of a fork.
- At this point the pierogi can be frozen for up to 4 weeks, or refrigerated overnight, or cooked in a large stockpot of boiling salted water. Only cook about 10 pierogis at a time, so that they have room to float without sticking. When the pierogi float, they’re done, this takes just a few seconds. The time will vary depend if you are cooking them fresh or frozen.
- Sauté the shallots or onion in the butter in a large skillet until the onion begins to brown. Add the drained pierogi and cook until browned and crisped. Serve hot with additional sour cream, applesauce, or other condiments.