

Gluten free wafer ice-cream cones
How to make ice-cream cones from scratch.
These golden-brown wafer cones are sturdy enough to support your favourite scoops of ice-cream, yet delicate and crisp thanks to the expert blend of Isabel’s Waffles, Crepe and Yorkshire pud mix.
If you love ice cream or any desserts served into delightfully crispy wafer baskets, an electric wafer cone maker is an essential piece of equipment for making authentic wafer cones.
Prep Time: 20 minutes
Total Time: 45 minutes
Makes: approx. 12-14 depending on the size
Ingredients
Ingredients
- 100g Isabel’s Yorkshire pud mix
- 2 Medium free-range eggs (about 122g)
- 50g white sugar
- 25g brown sugar
- 50g coconut oil or melted butter
- 50g milk or plant-based milk (high protein)
- 1 tsp Maple syrup
- 10 drops vanilla essence
- A pinch of salt
- Neutral flavour cooking oil for greasing the iron plates
Method
- Grease both plates of the wafer iron with oil. Preheat the wafer maker to 300°F (150°C) for at least 10 minutes before start making the batter. If your machine doesn’t have specific settings, start with the medium setting and adjust as needed along the way. If the machine does not allow for temperature control, then the ideal time for a given amount of batter will need to be determined individually.
- In a large bowl, combine the eggs, sugars, Maple syrup and beat vigorously for 2-3 mins approx. ensuring that the mix is perfectly whipped into a light pale mixture – you can use a balloon whisk for doing this job or a handle held mixer to help speed up the process, (but for this small amount I wouldn’t bother). Undermixing at this stage can produce wafer cones with an uneven colour and texture. After the eggs and sugars are well combined, add the melted butter or oil, vanilla, salt and milk to the mixture and mix well.
- Place the flour mix in a bowl and make a well in the middle, and whisk in slowly the egg and sugar mixture until well combined. Rushing this step can produce wafer cones with an uneven texture. Let the batter stand 5 minutes before proceeding to the next step; if not briefly rested, the batter may be too thin.
- Add approximately 1 1/2 or 2 tablespoons of the batter onto the centre of the wafer iron plate depending on the size of the cones you want to make. Then close the iron firmly and cook for about 2 minutes, turning it over half way through, until the wafer is uniformly golden brown. The exact cooking time and temperature will vary drastically from machine to machine; the idea is to find a setting and time that will cook the wafer at a gentle pace, helping drive out moisture without browning too fast. If the wafer is cooked too fast, the wafer will be brittle and difficult to shape and break. When cooked too slow, the wafer will be pale, and may not crisp fully once cool.

Open the machine and if one side looks more golden than the other, then using the help of a plastic spatula gently lift the wafer and turn it around, close the plate and allow it to cook for a few seconds more.
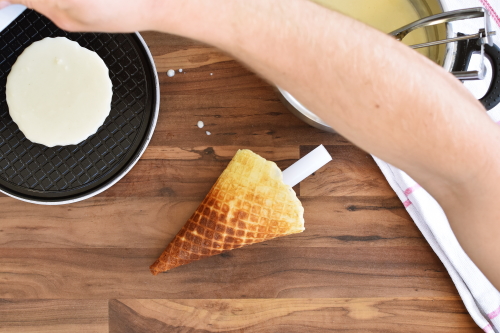
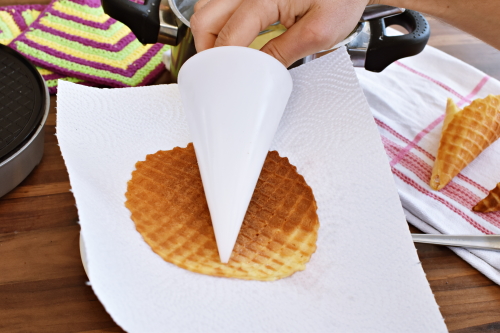
- To shape the wafer cones: You need to work quickly at this step as the wafer cools down in seconds, and if the wafer becomes hard, you will not be able to shape it.
Place a hot wafer on a clean kitchen towel. Set the waffle cone form on top, so that its tip is about 2 cm from the edge of the wafer. Fold the upper portion of the wafer over the cone form, and press firmly at the tip to create a seal. Roll the form over, working bit by bit to keep the wafer tight against the form, until you reach the outer edge. Hold the wafer cone firmly in place, seam side down, until cool enough to maintain its own shape, e.g. 30 secs approx.. Shaping the wafer cone is a skill and will require a certain amount of practice to master it.

- To Shape a Wafer Bowl: Turn a muffin tray upside down on a clean surface. Then place a hot wafer over the inverted tray cavities shaping it to help form a basket. Shaped by hand the excess wafer to create a frill around the edges. Remove the wafer basket from the tray, as if left too long, it may stick to the tray. You could also use a small bowl to help shape the baskets instead of the tray.

- As soon as the wafer cones or bowls have cooled to room temperature, immediately transfer to an airtight container. The wafer cones and bowls are extremely susceptible to the effects of humidity, and can begin softening in as little as 20 minutes if left in the open. Likewise, if stored in a container while warm, the wafer cones and bowls may steam and soften. But if properly cooked and well protected from air, they will keep for a week or more at cool room temperature.
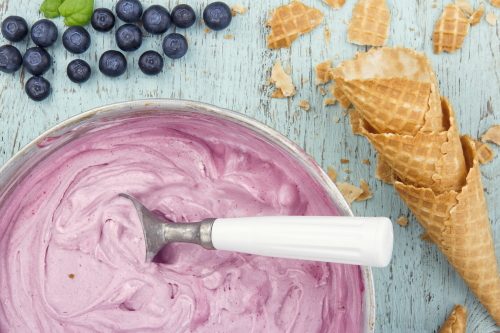
- Now your cones are ready, you can decorate them by dipping the edges in melted chocolate – dark, milk or white, then dip them into sprinkles or any sort of decorations you fancy!
Notes
Troubleshooting: If the wafer looks uneven or pale, the most common cause is the plates are not hot enough. Following that, uneven colour can be caused by uneven heating in a poor-quality machine, or by insufficient preheating. Stir the batter thoroughly, and give the machine additional time to heat. If the following wafer remains pale, increase the heat setting on the machine. Equally, if the wafer seems burned or excessively dark, reduce the heat before making the next waffle (or else briefly unplug a machine with no dial), or try cooking the next wafer for less time.
Coconut oil can be used in place of the butter . You can also use a vegetable cooking oil without impacting the integrity of the batter.
As with any new piece of equipment, wafer cone makers can require some practice to find the perfect heat settings and time, so give yourself room to learn and make a test round or two before any special occasions. Scrap pieces and rejects will still be tasty – try crushing them up to use as crispy toppings.
Make-Ahead and Storage
Properly cooled and stored in a airtight container the wafer cones or bowls will keep for about a week at cool room temperature.
Why it works
- Isabel’s blends make a strong and sturdy wafer cones.
- The heavy plates of a wafer cone maker spread the batter wafer thin, while driving out moisture and browning the batter on both sides, creating a unique colour and texture.


